Thursday, November 28, 2013

Blank Slate Patterns: Vintage V-Neck {Black Friday Sale}

*This post contains affiliate links. All views expressed are my own*

Just wanted to let you know about another great sale! Blank Slate Patterns. is having a Black Friday only sale (and her stuff is rarely discounted!).

I used the Vintage V-Neck for Nikolai's Halloween costume{I just went up another size and used fleece} and am planning on doing more (of the shirts) when the Holiday's end!

Blank Slate Patterns: Vintage V-Neck {Black Friday Sale}

This might be an awesome time to pick up the Beachy Boatneck pattern for the pattern flip in March! I also have been eyeing the Coastal Cargos. I've been thinking about making Nikolai some cargo's lately, it just seems like a cool pair of pants to have...

So go check out what she has! Click here to visit Blank Slate Patterns.

Blank Slate Patterns {Black Friday Sale}

2 patterns for $10. Code is BLACKFRIDAY. Sale is good through the end of the day Friday. Discount on patterns priced higher than $7.95 is $5.90 per two patterns. The code will only discount 2 patterns, but can be used multiple times.

Wednesday, November 27, 2013

Peek-a-Boo Pattern Shop: Comfy Cozy Slippers {And a BIG Sale}

*This post contains affiliate links. All views expressed are my own*

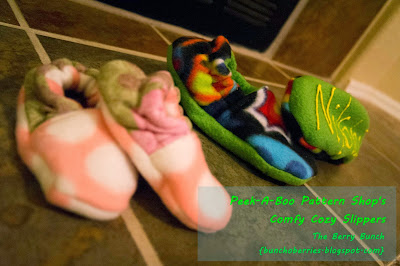
Don't you just love the holidays? I do! And I am really excited because this year, a lot of gifts are going to be handmade using my craft/sewing stash. And, I have already completed some stocking stuffers! Slippers using the Peek-a-Boo Pattern Shop Comfy Cozy Slippers! I bought them with the robe and used the discount code to save!

The Berry Bunch: Preview "Peek-a-Boo Pattern Shop {And a BIG Sale}"


I modified for the small pair a little bit because they did not go small enough for Samara's feet. I used the soles and toes from the classic footie pjs (size 6mos) and just downsized the heel to fit the sole and toes. I have to wait to try them on her when Nikolai isn't looking, don't want to give it away! I messed up with the direction of what was supposed to be lining (I used a knit) and the outer fabric (a fleece). But I think it looks cute this way. :)

The Berry Bunch: Preview "Peek-a-Boo Pattern Shop {And a BIG Sale}"


For Nikolai's I used puffy paint on the bottom because I do not have non-skid fabric. Since this was a suggestion for the classic pjs, I figure why not on the slippers? I have his first name on one and our last name on the other.

The Berry Bunch: Preview "Peek-a-Boo Pattern Shop {And a BIG Sale}"

The Berry Bunch: Preview "Peek-a-Boo Pattern Shop {And a BIG Sale}"

Once I made the first pair, these were so easy to put together. The longest part for me was waiting for the paint to dry! I am gonna need to make me a pair and guess what? I can! the sizes range from toddler 3/4 to women 8/9 (and directions to go beyond)! Guess I can make this for years to come! :) I love longevity of things! Plus, if you do not want the back strap, you can make it without. It comes with the directions!

And now I'm sure you want to see?!?  Peek-A-Boo Pattern Shop is having a sale! An awesome sale! It's the four days only. Gives you the chance to save even more!
*Update: Sale is now over. But, regular discount codes do apply!*


linking up at Freshly Pieced WIP Wednesday


Happy Sewing, and prepping for the Holidays!

Saturday, November 23, 2013

Peek-A-Boo Patterns Classic Footie PJ {Sew-A-Long}

*This post contains affiliate links. All views expressed are my own*

Ok, I know that I have talked a lot about Peek-a-boo Pattern Shop recently. I really love her patterns.

Well, truth is I need some long sleeve stuff for baby girl, and some warm stuff... Well, fleece was on sale at JoAnn's and I bought like... 4 yards.. Little man picked them all out.

Well.. I needed a pair of warm footie pjs for Samara.

Nap Time Crafters was doing a sew-a-long of the Classic Footie PJ. Since I had been eyeing that pattern ever since I first saw it when it came it, it was time to get it and sew up a pair! And, it was so easy, and it looks awesome! I am so excited!


I was scared about the zipper. But overall I love how they turned out!


And the footies! So cute! Her feet don't go all the way to them yet; I made them the 6 months size to last all winter! {hopefully!}


And now for some picks of baby girl


These were so easy and fast! I am waiting for more time to make another pair! Goodness knows I have enough fleece! :)


Did I mention how much I love this pattern! I have wanted this for a while and now that I finally have it I am so excited!

It has been updated to cover a range of newborn to size 12, full and half zip options for the larger sizes, and elastic instructions for around the ankle. I love it! I am thinking maybe a pair of Christmas ones too?

So, visit Peek-a-Boo Pattern Shop and check out her patterns! :) There are so many (with 52 added this year!)

Linking up at SewCanShe's Show off Saturday!


Happy Sewing,

Monday, November 11, 2013

Peek-A-Boo Hangout Hoodie Turned Onesie {Flip This Pattern}

*This post contains affiliate links. All views expressed are my own.

A while ago (over a year ago) I discovered the Peek-a-Boo Pattern Shop and loved what I saw but never bought anything. "Why?" you ask? I don't know.

I love her patterns. 

Now I own only 5. I say only because I want more and it is a miracle that I haven't purchased them all! How can you go wrong? They are wonderful! And range from 3-6mos to about a size 10-12, on average! So much better than the big company's patterns...

One of the patterns that I have I finally made. The Hangout Hoodie.

I wanted to make it for Samara, but shirts just ride up while holding her. So instead I wanted to do a onesie.

But before I started that I needed to try it regularly first. And both were re-purposed old shirts of mine! I love re-purposing! Enter little man...


I loved how it turned out. And not having a serger I think I did pretty darn well.

So then, enter the Onesie attempt. Not bad if I do say so myself... Brandon said it looked store bought! Awesome!

It is a bit big, but then I made it to fit Samara to the end of the winter! She is currently in a size 0-3 months, though quickly outgrowing that size. I made this one about a 6 month size. And she has a big butt when sporting the cloth diapers! :)


I have since added extra snaps to the bottom so it closes better. And I think my little girl looks just adorable in the hoodie!


I just used a current onesie I had and traced down the shirt 6 month size to the bottom. I also trimmed about a 1/4" on both sides of the front and back (1" all the way around) because my kiddos are so skinny! It makes it more fitted that way (the way most onesies are).


Who can resist those adorable blue eyes?


I think I need to make a pair of matching leggings! I feel so proud!


Yup, definitely need to make her a pair of leggings to make it an outfit! 


And the pattern works for both boys and girls? Score!

So... Click here to visit Peek-a-Boo Pattern Shop. and see what you like. Every Thursday she has an item usually about half off. And she has discounts for 3/5 items too! How awesome is that? And on the 18th she is doing a sew along for the Classic Footed Pajamas! What perfect timing for the cold nights, and the holidays! Christmas Fleece anyone?

Linking up to the Flip This Pattern Sew Along


Flip This Pattern


Until next time,

Friday, November 8, 2013

Halloween 2013

I love dressing up for Halloween, and I especially love doing it as a family. There is nothing greater than the cheesy, group-themed, Halloween costumes. And, I love making them! 

Here are the last 2 years... So fun!


And this year...


I was Tigerlily, Brandon was the Fox Lost Boy (Not anything to do with 'what does the fox say?'), Samara was Tinkerbell and Nikolai was Peter Pan. :)

Here are Samara's wings, green sparkly tulle sandwiched with cereal bag to make it crinkle...


Here was a picture before adding the lacing and wings so you can see the bodice and skirt. Got the idea here but didn't do halter...


Nikolai loved being Peter Pan! He was thrilled when people knew what he was dressed up as!


And what good is being Peter Pan if you can't shoot something?


And Brandon's Tail... Made with yarn and took forever! Tutorial used here...


And my Father-in-Law, pretty cool costume too!


I love it! So fun! Hope y'all had a fantastic Halloween!

Monday, November 4, 2013

The Foggy Foggy Forest - Crayon Melting Activity {Virtual Book Club for Kids}

Ok...

Now that Halloween is over and that craziness... I finally have had the opportunity to unload pictures from my camera and you know what that means? I finally can contribute my part to the Virtual Book Club for Kids blog hop! Yay! You know, cause the post title didn't hint to that already! :)

I had this idea in my head to do a 'letters of your name' book with crayon and wax paper... Yeah, it didn't work out that way! Instead it just turned into a 'letters of your name' melting crayon activity. Nikolai thought it was cool! That's all I can hope for! :)

First off, Foggy, Foggy Forest is great with the vellum pages! Nikolai loved it! I first wanted to do something with predictions and inference, but just left that to when we were reading the story. He had so much fun 'guessing' what the next page was going to be until we read through it so many times, he was jumping for joy with the next part! Sequencing probably would have been great for this activity too, but alas, the book is back at the library having needed to be returned...


Materials:
  • Crayon shavings: I used a crayon sharpener on all our dull crayons, even Nikolai helped a little bit but most of it was done during nap time
  • paper: for the letters, I used plain paper but you can use cardstock or any kind you prefer. I had these cut prior
  • wax paper
  • glue stick (optional): we used this to trace the letters and to keep the crayon shavings to stick to the paper. I shook off excess shavings back onto the rest
  • Iron: and board, with which to melt the crayons
  • paper towels: to protect your ironing board and iron from the melting wax and dye
  • scissors: to cut out the letters
  • string/yarn: for stringing the letters to make a banner

Steps:

1. Cut out wax paper big enough to fold over and sandwich the letter. Place the letter down on one side (inside) but do not sandwich yet.


2. We traced the letter with glue, but honestly, following the line with something else (like a finger) works too.) Nikolai giggled, he thought it was funny, but then was really serious! Silly kid!


3. Using pincer fingers, pinch some crayon shavings and place on the letter. Honestly, not much is needed. We barely but some on the letters and I had to iron the melted wax to the edges of the letters and got some on my board, eek! I also tried to keep excess off the wax paper, this is where the glue came in, I just lightly tapped it back onto the plate.


4. Fold over the wax paper to sandwich the letter.

5. Place a paper towel on your board, sandwich on that, then another paper towel. This will not only protect your iron, but your board as well!


6. Press your letter. I do not suggest to actually iron unless you see areas that may need it. just put the iron down, press, lift then move. 

*Nikolai just helped hold the iron, I do not advise to let your child do the ironing. Always watch your children around heated items.

7. Let the letter cool then cut! Nikolai sometimes helped cut by hand-over-hand.

8. If you want to make a banner to display your name, then string them onto yarn or twine. Secure the letter onto it's spot using knots. I haven't done this yet. Cannot decide on yarn or twine as it is going to be decoration for his 3rd birthday in December! 


Even though this did not turn out how I envisioned it in my head, it still came out pretty great. I even used all the crayon shavings with none left over! Nikolai is proud of his name and I need to hurry up and get it hanging. He wants it over his bedroom closet door. That is fine by me! I love that he wants it on display! :)

Thanks for stopping by! Please, check out these other sites contributing to the Book Club. If you have anything you want to share too, feel free to contribute!

There are a few rules for this blog hop that we ask you to follow, so make sure to read them: 
  1. Link up only posts inspired by Nick Sharratt that share children's book inspired crafts, activities, recipes, etc. Any other posts will be deleted.
  2. Visit other blog posts on the linky and comment on or share the ones you love!


see you next time,